Archive | Battle Briefings RSS feed for this section

Siege of Leningrad 1941-1944

Siege of Leningrad, Russia

Operation Barbarossa was the name given to a three-pronged attack that Hitler devised for the invasion of the Soviet Union. Slated to begin in May, 1941, it was delayed for a month, because of military diversions in Greece and Yugoslavia. This delay became crucial to the success of Hitler’s plans, as he had hoped to avoid battles in the Soviet Union during the severe winter months. Yet, on June 22, 1941, the operation began, with 150 divisions (3 million soldiers), led by armored divisions and bombers from overhead. The Soviet Union lost 2.5 million men, 22,000 guns, 14,000 planes and 18,000 tanks in the first initial push into the Soviet Union. From here, the German armies split out into three groups. Field Marshal Wilhelm Ritter von Leeb led the Army Group North towards the Baltic coast and the city of Leningrad. Forces from Finland, led by Marshal Carl Gustaf Emil Mannerheim, were also included with Leeb’s forces. Hitler’s plan for Leningrad was to ‘wiped off the face of the earth’.

The Siege: September 8, 1941 – January 7, 1944

Leningrad, in preparation of a possible take-over, began fortifying the city, putting up lines of defense with anti-tank ditches, and barricades, surrounding the city. Leeb’s 4th Panzer Group and the 18th Army, first took down Ostrov and Pskov, and then Narva, as the forces moved towards Leningrad. When Leeb’s Army Group North finally reached the Neva River, the last railway leading into Leningrad was destroyed on August 30th. This cut off all supplies to the city.

Mannerheim, for his part, first attacked the Karelian Isthmus while moving towards Leningrad, and advanced on Lake Ladoga along its eastern edge, where they settled in to wait. Meanwhile, other Finnish forces dug in along the Svir River in East Karelia, between the two lakes of Ladoga and Onega. The Finnish forces held these positions for the next three years, and did not move further towards Leningrad.

The Germans, meanwhile, captured Shlisselburg, thus cutting any supply access to Leningrad. Leeb also capture Tikhvin on November 8th, but could not move any further towards linking up with the Finnish troops. The Russians put up such a resistance, that Leeb finally had to retreat behind the Volkhov river. It was determined that, from this point, a siege position around Leningrad, would be the most effective tactic for the Germans in taking down the city.

This began the protracted period of three years of starvation and death for the population of Leningrad, as lack of supplies dwindled dramatically. Some supplies made it across Lake Ladoga, known during this time as the “Road of Life”, but it was not nearly enough to save a large majority of the people in the city. Yet, the city refused to give up and surrender to the Germans.

In January, 1942, Field Marshal Georg von Küchler replaced Leeb. The German troop infrastructure was replenished with new troops, allowing for von Küchler to hold off Soviet offensives, who were unaware that German troops had been refortified, particularly with the new heavier Tiger I tank. It wasn’t until Operation Iskra, that the Russians, under Commanders Marshal Kirill Meretskov and Marshal Leonid Govorov, utilizing the 67th Army and 2nd Shock Army, were finally able to open a supply path from Lake Lagoda’s southern shore into Leningrad. This allowed for supplies to finally get through to Leningrad, even if still not enough to save some of the people. In January of 1944, the combined Russian First and Second Baltic Fronts, along with the Leningrad and Volkhov Fronts, overwhelmed and pushed back the Germans. The Moscow-Leningrad railroad was finally retaken and the siege of Leningrad ended.

The siege lasted 827 days, with a loss of civilians at up to, potentially, 1.5 million, from a pre-war population of 3 million. When the siege finally ended, there were only 700,000 left in Leningrad. Nearly 1,017,888 Russian forces were lost, captured, or missing, along with 2,418,185 wounded.

Photo Gallery

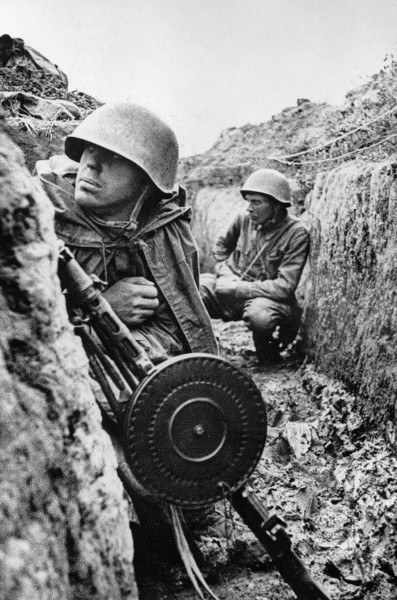
Soviet soldier in a trench with a DP-28 in Leningrad, September 1 1941
Photographer: Vsevolod Tarasevich
Source: Russian International News Agency

Civilians in Leningrad fetch water from a broken water pipe in 1941 or 1942
Photographer: Vsevolod Tarasevich
Source: Russian International News Agency

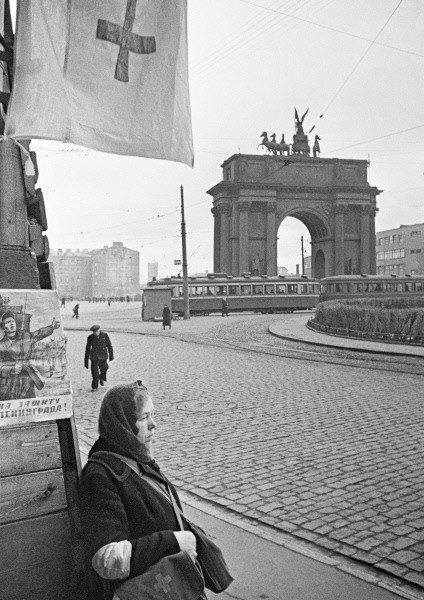
A Russian Woman at a first aid post near Narva Triumpal Arch October 9 1941
Photographer: Anatoliy Garanin
Source: Russian International News Agency

Russian civilians on a street near a damaged building December 10 1942
Photographer: Boris Kudoyarov
Source: Russian International News Agency

Soviet soldiers on Moskovsky Prospect Leningrad December 7 1941
Photographer: Boris Kudoyarov
Source: Russian International News Agency

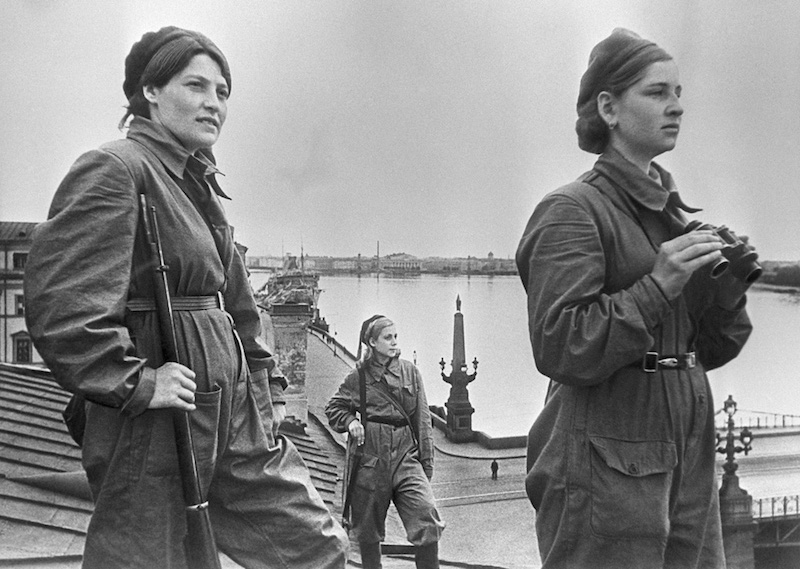
Female aircraft spotters on the roof of a building in Leningrad, May 1942
Photographer: Boris Kudoyarov
Source: Russian International News Agency

Soviet soldiers firing a DShK heavy machine gun at aircraft, October 9 1942
Photographer: Anatoliy Garanin
Source: Russian International News Agency

Soviet 85mm M1939 (52-K) anti-aircraft guns ready to defend Leningrad, March 1 1942
Photographer: Boris Kudoyarov
Source: Russian International News Agency


Fall of France 1940

Fall of France

When Adolf Hitler took over Poland in September of 1939, England and France declared war on Germany, but were too late to help Poland recover from the German assault. The nine-month period after the declaration of war by England and France, came to be known as the “Phony War”, because there was very little fighting between the three parties of Germany, France, and England. But in May, 1940, after Hitler turned his sights on France, everything would change.

The Beginning

Hitler decided, first, that he would take over Denmark, and then Norway, with both campaigns being successful, but at the cost of half of his German navy destroyers (10/20), three out of eight cruisers, two battle cruisers, and one pocket battleship. This path over land, and by sea in the North and Norwegian Seas, was of great importance in securing for Germany, the resources for iron and ore needed for its military use.

Then on May 10th, Hitler moved his forces into Belgium and the Netherlands, taking them over as well, all in preparation for the attack on France. At this point, the British had just installed Winston Churchill as Prime Minister, replacing Neville Chamberlain, and the British and France had to quickly combine forces in order to make a stand against Hitler in Belgium. While the Allies had almost enough resources to hold off Hitler, particularly at the Maginot Line, the placement of the Allied troops and fortifications in other areas were too spread out, whereas the German strike forces were extremely concentrated and organized.

The German Takeover: Case Yellow

The first route of attack for the Germans was to trap the English, French, and Belgium forces by breaking through the Sedan, and heading west towards the Channel. The Germans used the blitzkrieg tactic, deploying seven panzer tank divisions, Stuka dive bombers, and dropping parachute and airborne divisions behind the lines, where they could soften up the enemy in preparation for the final blow. This was accomplished by the 15th of May, whereupon the Dutch finally surrendered.

Meanwhile, the main focus for the Germans was to punch through the Ardennes Forest on May 10th, erroneously considered by the French, to be almost impenetrable because of the dense trees and poor roads. Therefore, fewer French forces were in place to help fortify this barrier.

Once the Germans had successfully moved through the Ardennes, they crossed the Meuse River, took over Sedan, and by May 16th, the Germans were nearly sixty miles west of Sudan, with very little resistance left. On May 20th, the 2nd Panzer Division had reached Abbeville, located at the mouth of the Somme River, close to the Channel, finally closing the circle on three French armies, the remaining Belgium forces, and the British. One large mistake was made by Hitler at this point, in that he ordered the halt of his forces, which provided a miraculous sneak opportunity for the British to evacuate from Dunkirk. Nearly 200,000 British soldiers, 140,000 French troops, and hundreds of refugees (Operation Dynamo), managed to evacuate before the Germans caught on to what they were doing. Once the Germans figured out what was happening, they attacked Dunkirk, and it fell on June 5th, 1940. Most of the evacuees made it out, and back to England, but numerous vessels were also lost, due to the bombing of ships from the German Junkers Ju-87 dive-bombers.

From this point, the Germans began a massive surge across France from all points, heading towards Paris. While there was some resistance from the French, they were ill-prepared to meet such a forceful, well-organized German army. On June 14th, German troops entered Paris, which surrendered with barely a fight, while the French government fled to Bordeaux, only to finally surrender on June 25th. , Premier Paul Reynaud resigned from the government, and was replaced by Marshall Henri Philippe Pétain, who signed the armistice on June 22nd, thus establishing Vichy France under German command.

Military Infrastructures of France and Germany, May 1940
France (north-east front) Germany
  • 1st and 2nd Army Groups, and 7th Army (also included were troops from Algeria, Morocco, and Tunisia; French Foreign Legion also deployed)

-63 infantry divisions (30 were regular)

-3 armored divisions (tank battalions, in total about 45-60 tanks; 5 battalions had Somua S-35 and Char B-1 models, the rest were the older varieties)

-11 Independent tank companies

-3 light mechanized divisions

-5 cavalry divisions

-13 fortress divisions

General Reserve:

17 infantry divisions, 2 motorized divisions, and 3 armored divisions

  • German Army (Wehrmacht):

-2.5 million well-trained soldiers

-2,500 tanks (9+ Panzer Divisions)

– the Luftwaffe air divisions

-Stuka bombers

-Junkers Ju-87 dive-bombers

*The ability of the German army to succeed quickly, was in the combination of coordinated superior numbers of armor/tank groups, supported by both air divisions, and the ground troops.

Communications by radio were also excellent, providing the linkage to where everyone was, and ordering where to go next.

 *After the Armistice was signed, France was only allowed 100,000 men in the forces, who were to maintain peace in the country. This was the same amount given to Germany after WW I and the Treaty of Versailles. It was a definite jab back at Germany’s former enemy, France, for the humiliation Germany suffered as a country under the terms of the treaty.

Photo Gallery

A heavily fortified French fortification destroyed near Arras France, May 1940
Photographer: Greiner
Source: German Federal Archive

A French civilian weeps as German soldiers march into Paris. This starts the beginning of Nazi occupied France for the next 4 years, June 14 1940
Source: National Archives and Records Administration

Knocked out British Cruiser Mk IV, France May 1940
Photographer: Keating
Source: Imperial War Museum

British soldiers on a ship off Dunkirk, France late May 1940
Source: United States Government

German soldiers with a camouflaged 3.7cm pack 36 anti-tank gun near a road in Belgium, May 1940
Photographer: Huschke
Source: German Federal Archive

Abandoned French Fortification from the heavily defended Maginot Line located at the French-German Border May, 1940
Photographer: Greiner
Source: German Federal Archive

French soldiers and Hotchkiss H35 cavalry tanks advance through a damaged town, May 1940

Knocked out British Cruiser Mk III cavalry tank in the Calais, France May 31 1940
We cannot use this one unless we find the name of the photographer – it was not listed here.

Battle of Peleliu 1944

September 15 to November 27, 1944

Operation Stalemate II was a simultaneous two-pronged simultaneous attack on Peleliu and Angaur. The choice of attacking Peleliu in the Palau Islands, was decided when considering the well-built airfield on that island. Once captured, the location would provide an excellent take-off point for the Allies to attack the Japanese over any surrounding islands from the air, thus neutralizing the enemy forces. There was also a smaller secondary air strip facility on the close-by island of Ngesebus. While the 1st Marine Division would attack Peleliu, the 81st Infantry Division would attack Anguar. Three days before the landings, the Navy began a heavy bombardment of Peleliu from both the sea and air, in order to reduce the Japanese defenses. Yet, what might have seemed a simple short battle in its planning, turned out to be anything but that, in reality.

The Attack

On September 15th, three regiments of the 1st US Marines Corps under Brig. General William Rupertus, made the first amphibious landing and assault on Peleliu. They immediately came under mortar and artillery fire, while attempting to land on two beaches, code-named “White” and “Orange”. Once on land, the marines had to also deal with hidden honeycombed networks of linked caves and coral ridges, all while under heavy fire from the well-hidden Japanese. The 1st Marine Regiment (3rd Battalion), under Col. Lewis “Chesty” Puller, landed at the northern left end of “White” beach and was to move straight inland towards the Umurbrogol ridge. The 5th Marine Regiment under Colonel Harold D. Harris, landed at the central point of “White” beach, with the plan to move straight in and capture the airfield, after meeting up with the 1st Marines. The 7th Marine Regiment under Col. Herman H. Hanneken, landed on the right southern end to secure the south tip of the island.

Meanwhile, Company K, of the 3rd Battalion, with 235 men led by Captain George P. Hunt, was directed to capture the Point, but lost about two-thirds of his group while doing so. Just before getting to the airfield, the 1st and 5th Marine Regiments endured a vicious counterattack from the Japanese, which was finally destroyed by five Marine tanks that fired back on the Japanese lines.

On the second day after capturing the airfield, the 1st Marine Division, along with the 1st Battalion, attacked the Umurbrogol coral hills, later known as “Bloody Nose Ridge”. This was a centralized point for the Japanese to fire down anywhere on the island and it needed to be destroyed. It was a month-long battle as soldiers crawled uphill over sharp coral and limestone rocks, that cut up their clothes and bodies.

Many officers and soldiers, without sufficient cover, were killed in this uphill battle, yet “Chesty” Puller kept pushing forward, even while having to travel on a stretcher because of injuries. Air support dropped napalm and shot bombs wherever they could find the enemy holed up in the hills. Above ground, Marines fought with coral rocks, bayonets, and fists when nothing else was available. The area of heaviest fighting with the Japanese was called the Pocket.

When Major General Roy Geiger finally determined that the ridge battle was at a stalemate and having lost too many lives, he called in the 321st Infantry Regiment from the 81st Division at Angaur to take on the battle, beginning a new phase altogether from original plans.

The 321st Infantry now moved parallel to the Umurbrogol hills, with the 5th Marines passing through the troops, heading north to clear out the island’s tip, then over the causeway connecting Pelelui to Ngesebus island. Once there, the Allies conducted an amphibious assault, along with tanks and Marine air support, taking over the airfield there and, later, the whole island. Once that was cleared out, all troops were focused on the Pocket, until the Japanese were finally taken out.

What was clear from this battle, was the ability of the enemy to have a lengthy underground cave and tunnel system, that allowed enemy troops to move from one place to another. Pillboxes were also heavily fortified, using concrete walls to separate into four chambers, with a shooter in each one. Each contained unit was also covered by a semi-automated sliding door that snapped shut just after the shooter had made his shot. Therefore, each section had to be cleared out to get the whole package fortification destroyed.

Losses at Peleliu
1st Marine Division = Total losses at 6,786

  • 1st Marine Regiment = 1,298 (56%)
  • 5th Marine Regiment = 1,378 casualties (43%)
  • 7th Marine Regiment = 1,497 (46%)

81st Division Combined Losses (Peleliu and Angaur) = 3,278

Japanese Army Losses = 10,700 in total, 200 taken prisoner

Total American Losses = 9,800

On the Umurbrogol hills, the 1st Marines destroyed 145 caves and pillboxes, and killed 3,942 Japanese soldiers.

Photo Gallery

U.S. Marines in assault craft approaching Peleliu, Palau Islands, September 15 1944
Source: United States Marine Corps

U.S. Marines resting on landing beach Orange 2 Peleliu September 1944
Source: United States Marine Corps

U.S. Marines fighting on Peleliu with support from a Sherman Tank
Source: United States Marine Corps

U.S. 7th Marine Infantry Regiments command post inside a former Japanese anti-tank ditch, September 15 1944
Source: United States Marine Corps

New: Wrecked Japanese aircraft and knocked out Japanese Type 95 Ha-Go light tank, 1944
Source: United States Marine Corps Frederick R. Findtner Collection

U.S.M.C. 75mm pack howitzer and it’s crew, September 1944
Source: United States Marine Corps


Battles of El Alamein 1942

The Two Battles of El Alaheim, Egypt

Warfare in North Africa, from January to July in 1942, had been a back-and-forth affair, with both Allied and Axis forces winning and losing key point locations along the way. By the end of July, both sides were at an impasse at the Alaheim line, taking time to finally resupply and regroup. On the Allied side, Lt. General Bernard L. Montgomery was newly installed in July as commander of the Eighth Army, under General Sir Harold Alexander. Winston Churchill’s directive was for Montgomery to take down Germany’s Field Marshall Erwin Rommel (the Desert Fox) and the Afrika Korps, once and for all.

The Battle of Alam Halfa: Part I

Montgomery had calculated that Rommel would try to attack through the Alam el Halfa Ridge, in order to get to Alaheim, rather than going around Allied forces to Cairo. When Rommel finally made his attack on August 31st, Montgomery held him off for nearly a week of bloody fighting, losing some 1,750 killed or wounded, 68 tanks and 67 aircraft. During this time, the Allied forces had pushed Rommel back to just past an Allied-built minefield, and there the Allied forces halted. Rather than pushing out further to attack Rommel, Montgomery waited while much needed reinforcements flowed in, particularly the American Sherman tanks that were off-loading at Suez. Rommel’s forces, on the other hand, were already severely depleted from constant battles, Allied air bombings, lack of reinforcements and supplies. During this waiting period, which was initially considered controversial, Montgomery spent time with the troops, began training exercises to better prepare the soldiers, and letting them get to know and trust him. Montgomery, in turn, established his visual image by wearing the black beret, that would become his trademark of his presence on the field. His men would always know when he was there with them in the battlefield.

The Battle of El Alamein: Part 2

By the time the second battle began on October 23, 1942, Montgomery had nearly double what Rommel had in the field: 220,000 soldiers, 1,029 tanks, 750 aircraft, 900 field guns, and 1,401 anti-tank guns. Beginning with heavy bombardments of the Axis lines, while infantry soldiers crossed over the mine fields, the tank division was also deployed, defeating anyone standing in their way. During a subsequent battle, Operation Supercharge, the Germans had to commit all of it armored reserves, losing some 100 tanks. The German supply lines, along with badly needed oil reserves being transported from overseas, had been destroyed, thanks to intercepted intelligence by the Allies.

The Allied forces, on the other hand, had hidden their supplies, where they were easily accessible when needed. They also pretended to show they would attack from other areas, from where they did eventually attack, thus providing the element of surprise. Through further carefully crafted operations, the Allied troops were able to decimate Rommel’s forces, until he finally determined that he would have to retreat to Tunisia, and, later, into Italy. This was a decisive turning point for the Allis in WWII, in being able to run the Germans out of Africa.

Allied Participants at Alam Halfa:

Lt. General Bernard L. Montgomery, 8th Army
  • 44th Division
  • 7th Armored Division

Under Lt. General Brian G. Horrocks

  • XIII Corps

Under Air Vice Marshall Arthur Coningham

  • Desert Air Force

Under Air Chief Marshall Arthur W. Tedder

  • Wellingtons of the Royal Air Force – Middle East Command
Allied Participants at El Alaheim:

Lt. General Bernard L. Montgomery, 8th Army
  • X Armored Corps
  • XXX Corps
  • 578th Army Troops Company
  • 1st Armored Division
  • XIII Corps
  • 10th Armored Division
  • 2nd New Zealand Division
  • 9th Australian Division
  • 9th Armored Brigade
Operations

  • Operation Bertram (the great deception)
  • Operation Torch
  • Operation Supercharge
Strategic Phases:

  • The Break-In
  • The “Dogfight”
  • The Break-Out

Photo Gallery

A British Humber MkII armored car on patrol south of El Alamein, Egypt, July 1942
Photographer: McLaren
Source: Imperial War Museum

A German 8.8cm FlaK gun (also known as the 88) with a gun shield being towed during the First Battle of El Alamein, July 1942
Photographer: Ernst Zwilling
Source: German Federal Archive

British infantry in a defensive position near El Alamein, July 17 1942
Photographer: Fox
Source: Imperial War Museum

British Crusader tanks moving toward the front lines during the Second Battle of El Alamein, October 24 1942
Photographer: Gladstone
Source: Imperial War Museum

Montgomery with binoculars observing the field, Egypt, November 1942
Source: United States National Archives

Battle of Guadalcanal 1942-1943

The Battle of Guadalcanal

After the disastrous attack on Pearl Harbor, Hawaii, on December 7th, 1941, and the subsequent entry into the war by the United States (US), Japanese naval fleets were put under very close scrutiny. During a US reconnaissance flight over the Solomon Islands in July of 1942, to the northeast of Australia, it was determined that the Japanese were building a soon-to-be-completed airport on Guadalcanal, and plans were made to invade Guadalcanal and several surrounding small islands across Savo Sound. The objective was to capture the airport and finish it out under Allied command. Allied planes could then take off from the island, heading out to engage, as needed, any Japanese naval fleets found in the Pacific. US troops were already stationed in New Zealand, as part of training exercises, and were quickly commandeered for this new operation. It would become the first ground invasion of the war in the Pacific, and the longest campaign. It would also be the first time American soldiers had to fight within a jungle setting.

The Invasion Begins

With fair weather favoring the troops’ landing on the beach on August 7th, 1942, just northeast of the airfield, two battalions of the 5th Marine Regiment moved in and set up a cover perimeter for protection of the other troops landing right behind them. The 1st Marine Division of the 5th, began moving to the left of the airfield, while the 1st Marine Battalion of the 5th, began moving inland, to the right of the airfield. The troops found themselves in the jungle, one that caused a certain disorientation, as the soldiers trudged through steamy swamps, hacked down tall grassy overgrowth, yet met little resistance from only a few Japanese snipers. It was considered later, a strategic surprise over the Japanese, that they had no clue the Allied forces had landed. The airport was quickly taken over by the 1st Marine Division, and renamed Henderson Field, in honor of a heroic flier, lost at the Battle of Midway. The second group, to the right, had moved into Kukum, just past the Lunga River, and found no enemies left, but plenty of supplies left behind.

As supplies and more troops were being unloaded on the beach, however, the Japanese finally began fighting back with waves of fighter plane assaults on the convoy ships, just offshore. Amazingly, there was only slight damages to the ships, and none incurred on the supplies and troops on the beach. The next day brought new air assaults, and the first transport ship went down, followed in the next few days by the U.S.S. Astoria, Quincy, and Vincennes, the H.M.A.S. Canberra. The U.S.S. Chicago stayed afloat, but was severely damaged. Initially, in the following first weeks, retaliation was sparse and ineffective.

The battle for the airfield was only just beginning, and it would be brutal, as the airfield regiments had to dig in around the airfield and fend off multiple assaults. On September 12th, at what would be known as the Battle of the Ridge, located just a short way from the airfield, the Japanese attacked with heavy naval bombings, and ground troop assaults. There would be multiple back-and-forth battles over the next few weeks. The 164th Infantry arrived just in time on the 13th of October to jump into battle. The 11th Marines were an integral part of successfully resisting the Matanikau attack of Japanese foot troops, coming in behind a tank assault on the 3rd Battalion, 1st Marines.

In later weeks, Japanese ground troops changed their ground tactics, utilizing guerilla-styled techniques in isolated violent skirmishes, then disappearing into the jungle again.

Alternatively, on the seas, the Japanese suffered heavy naval and air losses when, in a daring unique assault, Rear Admiral Callaghan drove his force of cruisers and destroyers right down the middle of two out of three Japanese naval columns, firing from both starboard and port sides, right into the enemy columns. While his ships were damaged by the time they got through, the enemy were all turned around and firing upon each other in the dark of night. Unfortunately, Callaghan was killed during this assault.

The Invasion of Guadalcanal was, in the end, a hard-won decisive victory for the Pacific Allied Command. The Japanese were finally forced off the island by February 1943, due to their heavy losses. This battle was considered the turning point in the Pacific battle arena, and also provided the Allies with a clear lane of communications and transport between Australia and the United States. Of notable importance was the bravery and tenacity of the US Marines in holding the Henderson air field through the span of the battle over several months.

Photo Gallery

Tenaru River in the jungles of Guadalcanal, Solomon Islands, 1942
Source: United States Marine Corps

F4F Wildcat fighters of the US Navy and Marines on Henderson Field in Guadalcanal, January 1943
Source: US National Archives and Records Administration

Abandoned Japanese Type 94 37mm anti-tank gun (It was obsolete against western medium tanks) November 1942.
Photographer: Mac McCullough
Source: United States Marine Corps

Japanese type 92 heavy machine gun crew in 1942 or 1943
Source: United States National Parks Service

Destroyed Japanese tanks at the mouth of the Matanikau River, October 1942
Source: United States Marine Corps

U.S. Marines resting in a field on Guadalcanal armed with older M1903 Springfield and Browning Automatic Rifles, 1942
Source: United States Navy Naval History and Heritage Command

Two American M2A4 light tanks and an M3 Stuart light tank in the middle both were armed with a 37mm main gun, 1942 or 1943
Source: United States Department of Defense


D-Day Invasion of Normandy 1944

The Invasion of Normandy

First suggested as an alternative approach to invading Europe during the initial Operation Husky discussions, Operation Overlord would become one of the largest operations of World War II. Unable to hide such a concentration of military assets consisting of tanks, jeeps, bulldozers, and other military equipment on the British Isles, along with 10,000 planes, the Allied Command determined that a bit of subterfuge was needed, in order to confuse the enemy. An elaborate plot was devised to indicate that the landing would occur from the narrowest point of the English Channel, to the Pas-de-Calais (Strait of Dover).

For the Germans, it was hardly a secret that an Allied invasion was coming; it was just a matter of determining where and when it would take place. As part of the ruse, Allied Command fed false information about an American army group planning to invade at Pas-de-Calais, along with showcasing fake landing craft along the British coastline. Dummy tanks were also put out in full view of German reconnaissance planes flying by. The subterfuge was so successful, that when the invasion of Normandy began, the Germans thought that this was a mere deterrent from the real invasion coming at the Pas-de-Calais.

D-Day: Invasion of Normandy – June 6th, 1944

D-Day is currently regarded as the largest invasion force in known history, with 7,000 ships and landing crafts, manned by 195,000 navy personnel from eight Allied countries, off-loading roughly 133,000 troops from England, Canada, and the United States. Five beaches, over a 60-mile stretch along the Normandy coastline, code-named Utah, Omaha, Gold, Juno, and Sword, were the focal points of incursion into the country. Hours before the land invasion began at dawn, airborne troops were dropped during the night at strategic points along the assault line, in preparation for covering the troops landing on the beaches at dawn.

The choice for using those beaches was that wheel-tracked vehicles could safely navigate the beach sand, and head for Cherbourg, the first objective for a take-down. Meanwhile, Allied foot troops would move into the countryside, where everyone would meet up, and then be reinforced by subsequent landings of more troops and military armaments. At the end of June, reinforcements consisted of an additional 850,000 men, 148,000 vehicles, and troop supplies at 570,000 tons. The Allied supply chain consisted of two pre-fabricated harbors, materials for building a railway replacement system, 20 underwater pipelines from England to France, pumping one million gallons of gas daily for transport vehicles, and use of French road systems for high-speed travel, later named the “Red Ball Express”.

Casualties of 10,300 lost, were incurred in that first day of landing, with 2,000 at Omaha Beach alone, where German defenses were heavily fortified. The Omaha operation was nearly lost, until small groups of brave men began working their way up the bluffs, clearing landmine paths and, whatever or whoever they could, along the way. The forces then were able to move in and travel to the meetup point further inland.

Tactical surprise was successfully achieved for Operation Overlord, although at great cost in the Omaha landing sites. The massive well-planned landing operation at Normandy would be the beginning of the end for the German forces in France and, ultimately, Adolf Hitler. 

 The Landing Groups at Normandy
(from left to right on the mapped beaches)
UTAH

Landed:

1,700 vehicles

23,250 Americans

Killed: 197

Missing: 60

Major General J. Lawton Collins-7th Army Corp

-led by General Omar C. Bradley-1st American Army

From the 4th American Infantry Division, are:

  • 8th Infantry
  • 22nd Infantry
  • 12th Infantry

Meets up with the 82nd and 101st American Airborne Divisions. Reinforced by amphibious tanks.
 

OMAHA #1

Landed:

1,450 Americans

36 landing crafts

Only 3 DD tanks of 29 launched, made it.

General Leonard T. Gerow-5th Army Corp

-led by General Omar C. Bradley-1st American Army

  • 16th Regiment of the 1st Infantry Division
  • 116th Regiment of the 29th Infantry Division (Able and Baker Companies)

Divided into four landing sectors: Charlie, Dog, Easy, and Fox. By plan, to be reinforced by the 2nd and 5th Ranger Battalions.
 

OMAHA #2 (Pointe de Hoc)

Total survivors are about 33 men from #1 and #2, commanded by Lt. Walter Taylor, of Baker Company.

 General Omar C. Bradley-1st American Army-led by Lt. Colonel James E. Rudder

2nd Ranger Battalion (225 Rangers)

GOLD

25,000 men landed
400 casualties

 Lt. General Miles Dempsey-British 50th Infantry Division, 2nd Army.

  • Dorsetshire Regiment
  • Hampshire Regiment
  • East Yorkshire Regiment
  • Devonshire Regiment

47th Royal Marine Commandos

JUNO

Two assault sectors: Nan & Mike

Only 1 tank made it

21,400 men landed

1,200 killed

Lt. General Miles Dempsey-British 2nd Army

  • Canadian 3rd Infantry Division
  • 7th Brigade
  • 8th Brigade
  • Royal Winnipeg Rifles

1st Hussar Tank Regiment  

SWORD

29,000 men landed
630 casualties

Lt. General Miles Dempsey-British 2nd Army

  • British 1st Corps
  • 3rd Parachute Brigades

5th Parachute Brigades

Photo Gallery

American troops watch activity ashore on Omaha Beach as their LCVP landing craft approaches the shore, Normandy, France June 6 1944
Source: US National Archives and Records Administration

U.S. Army Rangers show off the ladders they used to scale the cliffs at Pointe du Hoc, Normandy, July 6 1944
Source: US National Archives and Records Administration

American A-20 Havoc bombers of U.S. 416th Bomb Group attack German road networks in Normandy, June 6 1944
Source: US National Archives and Records Administration

U.S. Army African-American soldiers set up a M114 155mm howitzer in France, June 28 1944
Photographer: Rothenberger
Source: US National Archives and Records Administration

American 105mm M7 self-propelled artillery in Carentan, France, June 1944
Source: US National Archives and Records Administration

A camouflaged SdKfz. 251 armored halftrack passes a column of German troops, June 1944
Photographer : Theobald
Source: German Federal Archive

Camouflaged German 7.5cm PaK 40 anti-tank gun and it’s crew, June 1944
Photographer: Arthur Grimm
Source: German Federal Archive

Two German soldiers with camouflaged helmets with a MG34 light machine gun, June 1944
Photographer: Jesse


Allied Invasion of Sicily 1943

The Invasion of Sicily

After the success of the African campaign against the German and Italian forces, the British and American command began plotting a new campaign, Operation Husky, that would move Allied forces from Africa into Europe from the southern region, starting with Sicily. The main characters conducting this strategic meeting at Casablanca, Morocco, were British Prime Minister Winston S. Churchill and President Franklin D. Roosevelt, his Army Chief of Staff George C. Marshall, and other top military staff.

The main argument, presented effectively by Britain, was if Sicily could be taken, this would open wide the Mediterranean Sea shipping lanes to further Allied use. After conquering Sicily, the Allied forces could then move into Italy and work its way north, taking out Italy, run by the Axis dictator and fascist prime minister, Benito Mussolini, known as “Il Duce”.

General Dwight D. Eisenhower, as supreme commander, assigned the operation to General Honorable, Sir Harold Alexander, commander of the Allied 15th Army Group. This group consisted of the British Eighth Army, under General Montgomery, and the American Seventh Army, under Lt. General George C. Patton. The invasion date was set for July 10th, 1943, and strategic planning was developed and approved, keeping in mind three major factors: Sicily’s topography, location of Axis air bases, and potential resistance factors.

The Invasion

On the night of July 10th, 3000 vessels carrying 160,000 American soldiers, 1,800 pieces of artillery, and 600 tanks, newly released from the African campaign, moved through rough seas, and landed in the southwestern corner of Sicily. Beachheads at Licata, Gela, and Scoglitti, were secured, while the British troops landed on the southeastern Sicilian coastline, securing the area from Cape Passero to Syracuse. The port of Syracuse was taken within two days.

A Canadian infantry division, utilized to keep open communications between the British and American troops, moved west, linking up with the Americans at Ragusa. Meanwhile, a team of British and American airborne infantry, slated to drop in to seize enemy airfields, landed far from their objectives, due to heavy winds and pilot error, and failed to achieve their initial objectives. However, on the 11th of July, the 1st Infantry captured the airfield at Acate, effectively taking out 80 planes and German control over the Sicilian skies.

The American forces pushed forward, meeting less resistance in Canicatti, while infantry and tanks, moving west, captured Agrigento on July 22nd, and then Palermo on July 30th. The 1st infantry and the Canadians, moving through central Sicily’s rough mountainous terrain, captured Nicosia and Agira on July 29th. From July 29th to August 5th, the bloodiest battle was fought at nearby Troina, with the 1st Infantry finally succeeding in forcing the Axis forces to move back towards Messina at the northeastern tip of Sicily. The British also forced Axis forces to move back from Paterno and Adrano, towards Messina, the gateway back to Italy. While the Axis forces did succeed in quickly evacuating 100,000 troops, they left behind huge stores of military materials. As Hitler and Mussolini had also unwisely decided to pull all forces back to the north of Italy, this left Italy open for the subsequent take-over by Allied forces, and the fall of Mussolini.

Important Facts to Know:

General Harold Alexander: Allied 15th Army Group – Operation Husky
Lt. General George C. Patton:
US Seventh Army Groups
(Western Task Force 343)
General Sir Bernard Montgomery:
British Eighth Army
(Eastern Task Force 545)
  • 1st Infantry Division
  • 3rd Infantry Division
  • 9th Infantry Division
  • 45th Infantry Division
  • 82nd Airborne (505th & 504th Parachute Regiments)
  • 2nd Armored Division
  • 1st Canadian Tank Brigade
  • British 1st Airborne Division
  • XIII Corps:
    • 5th Infantry
    • 50th Northumbrian Infantry Division
  • XXX Corps:
    • 1st Canadian Infantry Division;
    • 51st Highland infantry Division;
    • 231st Independent Infantry Brigade Group

Photo Gallery

Crew of M4 Sherman tank after landing on Red Beach 2, Sicily, July 10 1943
Photographer: Osborne
Source: United States Army Signal Corps

U.S. Army DUKW comes ashore at the beach at Gela, Sicily, 1943
Source: United States Army

Bernard Montgomery and George Patton ride a vehicle near Palermo, Sicily, July 18 1943
Source: US National Archives and Records Administration

U.S. Army soldiers pose with Sicilian civilians July 11 1943
Photographer: Osborne
Source: United States Army Signal Corps

German Tiger I heavy tank, August 1943
Photographer: Esselborn
Source: German Federal Archive

U.S. 81mm M1 mortar team, 1943
Source: United States Army


Click Here For Your FREE WWII Special Report