Archive | Battle Briefings RSS feed for this section

Battle of Britain 1940

July 10, 1940 – October 31, 1940

As World War II began in 1939 on the European continent, Prime Minister Neville Chamberlain of Britain continued his pre-war stance on appeasement, that keeping Germany and Adolf Hitler on friendly terms, would avoid any move by Germany towards full-out war with Britain. Chamberlain had signed the Munich Pact (1938) with Hitler, that allowed Czechoslovakia to be taken over by Germany, but would prevent any further invasions of European countries.

This appeasement strategy was short-lived, as Germany invaded Poland in September 1939, and Britain promptly declared war on Germany. When Germany occupied Norway in April 1940, and then invaded Holland, Belgium, and the Netherlands on May 10, Chamberlain lost what was left of his support in the House of Commons that same day, and he resigned.

Winston Churchill, First Lord of the Admiralty, who had strongly opposed Chamberlain’s appeasement strategy from the very beginning, and was highly popular with the British people, became Prime Minister on May 10 and, at once, set the tone for how Britain now viewed its relationship with Germany. Churchill declared that the British people would resist an invasion at all costs and would never surrender to the Germans. The gloves were off and Britain prepared to defend itself.

On June 17, 1940, after France was invaded and defeated by Germany, the French signed an armistice, pulling themselves out of the fight. The German forces were now close enough on the northern coastlines to launch an invasion over the English Channel. Britain, however, had highly-trained fighter pilots, a well-planned air defense network (Dowding System) in place, and experienced air battle strategist, Air Marshall and Commander in Chief, Hugh Dowding, leading the Royal Air Force (RAF). At his disposal, were the RAF’s Hawker Hurricanes and the Supermarine Spitfire planes. The Germans, who suffered massive naval losses in the taking of Norway, had no available options for conducting amphibious operations, no navy to speak of, and the Luftwaffe (air force) had also been heavily depleted in earlier campaigns.

Added to that, there was very little available reliable intelligence on British defense strategies, except for locations of radar positions and locations of the RAF air bases. The only way that Germany could mount Hitler’s planned “Operation Sea Lion,” a coastal landing and ground invasion of Britain, was to first take out the RAF, its radar sites, and the air bases with its planes on the ground. Even while hoping that the British would want to make a last-minute deal for peace, for the rest of June and into early July, the Germans built up their air force resources on both the French and Belgium coastline airfields.

The Battle Begins

On July 10th, 1940, the first of several strafing attacks by air began, with hits on British coastal towns, on convoys in the British Channel, and on the port of Dover, all the way to Plymouth. During this first attack, the Germans presumed that the British RAF resources would be moved down closer to the coastline for defense purposes, and this would become the target for the second attack. By the first week of August, the Germans had now fully reinforced their attack forces with 1,015 bombers, 346 dive bombers, 933 fighter jets, and 375 heavy fighters. The battle from the air intensified on August 5th.

A second German air attack began on August 13th and the goal was to take out any air fields, planes, and known communications centers, creating an open path for the planned bombing of London. As the battle progressed, however, the Germans realized the RAF was still very active. Dowding had wisely moved part of his air command to a different area where the Germans did not expect them, and seven RAF squadrons from the northern coastlines, met the Germans in a separate battle from the southern coastline. Thirty German heavy bombers, carrying four-man crews, were taken down, while the British suffered only two pilots injured.

But, on August 31st, Dowding’s Fighter Command (one part of three in the RAF) suffered the most losses to date. The Germans, thinking that they had wiped out the RAF, changed tactics. The German landing operation, Sea Lion, was put aside in favor of a more intensified bombing attack on London, which began on September 7th, and is historically noted as the beginning of the Blitz, overlapping the Battle of Britain. While there was serious damage sustained to buildings and residents, Britain’s defenses rapidly regrouped and were ready for the next round, which occurred during daylight on September 15th. This time, the Luftwaffe was severely repelled and suffered massive losses that depleted their forces.

Meanwhile, the RAF’s Bomber Command conducted night raids along the French coast where Germans had prepared barges for crossing the channel and targeted German land installations, severely reducing German capabilities for resupplying its forces. Historians view this battle as ending on October 31st, 1940, but the Blitz (blitzkrieg), starting in September 1940, overlaps the Battle of Britain timeline, which gave Britain the win against the Germans.

The Blitz, which lasted until May 1941, was a continued barrage by the Germans from the air on London, and other British cities and towns, yet they were never able to prove sufficient air dominance over Britain to conduct an invasion. Aside from the loss of life and injuries sustained by the British people, the bombing of Coventry Cathedral (named St. Michael), along with a sizable part of the city, was a notable and somber event. The cathedral was left in its damaged state as a memorial to all those who gave their lives during this time. There is now a new St. Michael’s Cathedral in Coventry, while the original remains in place as a monument.

###

British RAF German Luftwaffe
  • Air Marshall Hugh Dowding
  • Air Marshall Keith Park
  • Air Marshall Trafford Leigh-Mallory
  • Air Marshall Sir Quintin Brand (S.A.)
  • Air Marshall Richard Saul
  • Air Marshall Lloyd Samuel Breadner Zdzislaw Krasnodebski (Squadron 303 – Poland)
  • Commander Hermann W. Goering
  • Field Marshall Albert Kesselring
  • Field Marshall Hugo Sperrie
  • General Hans-Jurgen Stumpff
  • Air General Rino C. Fougier (Italy)
  • Royal Air Force, Royal Canadian Air Force, with pilots from the US, Poland, NZ, Czech, Belgium, Australia, South Africa (S.A.), France, Ireland, S. Rhodesia, Jamaica, Barbados, Newfoundland, and N. Rhodesia
  • Luftwaffe
  • Corpo Aereo Italiano
1,963 working aircraft 2,550 working aircraft
  • 1,542 aircrew killed
  • 422 aircrew wounded
  • 1,744 aircraft destroyed
  • 2,585 aircrew killed or MIA
  • 735 wounded, 925 captured
  • 1,977 aircraft destroyed
Civilian losses: 90,000 casualties, with 40,000 killed
While the win of the Battle of Britain was obviously attributed to the pilots from many nations, who stepped in to help fight, the win could also be attributed to the civilians who stepped in en masse to man the factories, work at command centers around the country, take part in tracking enemy movements and sending reports that activated the pilots to battle where needed, organized rescue services, man ground fire equipment, and so much more.

Photo Gallery

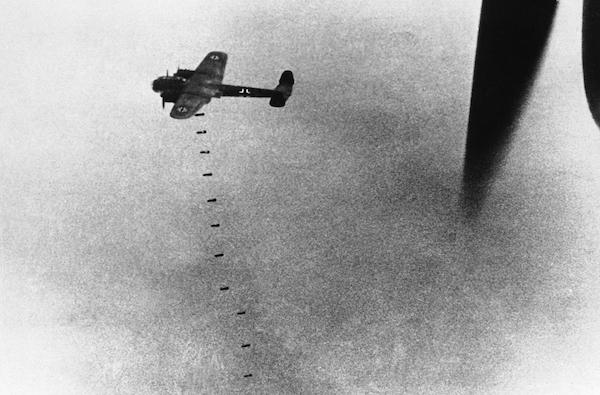
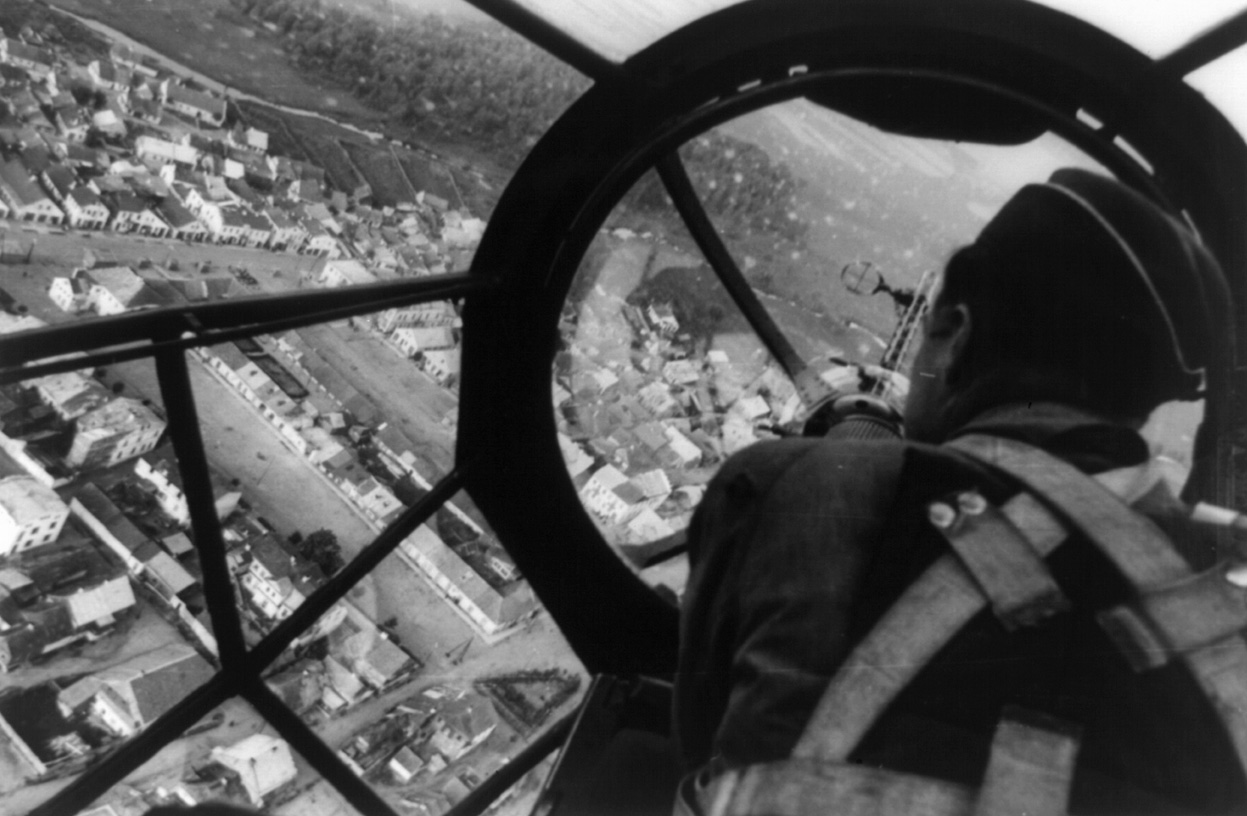
A Dornier D0-17 medium bomber dropping its bombs on London, September 20 1940

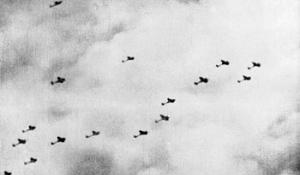
A fleet of German Heinkel He 111 medium bombers flying over England, September 26 1940
Photographer: J. D. Bisdee
Source: Imperial War Museum

Tracer bullets from a British Spitfire fighter plane hitting a German Heinkel He 111 bomber over Bristol, England, September 25 1940
Source: Imperial War Museum

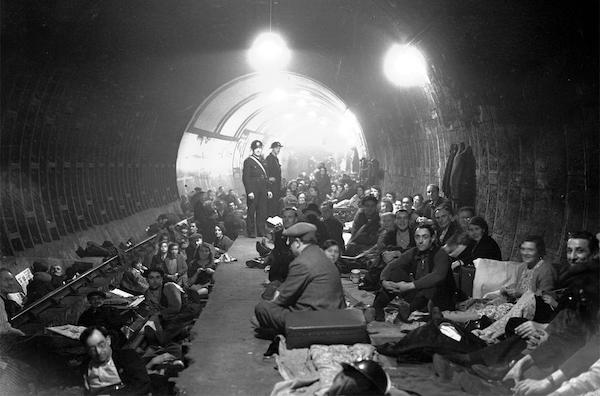
Londoners spending the night underground in the safety of the subway tunnel so they won’t be killed by German aircraft during the “Blitz”, October 8 1940

Siege of Sevastopol 1941-1942

Siege of Sevastopol
October 30,1941 – July 4, 1942

In 1941, Sevastopol was a thriving naval port on the Black Sea coastline, and not even in Hitler’s plans for a conquest as part of the Operation Barbarossa southern branch of invasion. The plans changed rapidly when in June 1941, two Soviet bombers took off from Sevastopol and destroyed 11,000 tons of vital oil reserves at the Ploiesti oil fields in Romania. Colonel General Erich von Manstein, the commander of the LVI Panzer Corps headed for Leningrad, was immediately sent to the Army Group South, to command the 11th Army in southern Ukraine. His goal, as dictated by Hitler, was to capture the Crimean Peninsula, including the naval base at Sevastopol.

Without his usual tank resources, Manstein utilized siege tactics, such as heavy sustained bombardments and then sent in infantry divisions to take out what was left along the way. The grueling path to Sevastopol went through Perekop, Chongar, Arabat, and the Ishun Lakes, crossing over small bodies of waters, and the Germans met rugged resistance every step of the way. When Ishun was taken, the Russian 51st Army retreated to Sevastopol, and this event began the siege of that city and fort. Taking the fort and city proved to be far more difficult than predicted, however.

Commanding the Soviet armies were Vice Admiral Filip Oktyabrsky, Major General Ivan Petrov, and Major-General Petr Morgunov, wily opponents who managed to plug holes wherever they came up. The surrounding geographic defense of Sevastopol that included heavily fortified hills and ravines, forced the Germans to always be moving uphill, facing machine-gun and rifle fire from hidden fortifications, mortars, and bombardments from ships on the coastline.

Even so, there was not enough concrete bunker fortifications in the hills, as, for decades, it had traditionally been thought that any external attacks would come from seaside. The only chance the Russian command had available for staying in the game, was to keep bringing in more soldiers by sea (388th Rifle Division), including recruiting sailors, the Soviet Naval Infantry, and any local citizens to help with fortifications and repulsing Germans attacks.

Meanwhile, at Feodosiya, Soviet Lt. General Vladmir L’vov courageously landed 5,000 soldiers from the 51st Army on December 26th, 1941, with another landing of 23,000 soldiers of the 44th Army on December 29th. A tank battalion was also included, and this large reinforcement caused the Germans to stop and deal with the newcomers there, before moving further on Sevastopol.

By now, both sides had suffered large losses by the end of December 1941, with the Germans incurring 8,595 casualties, while the Soviets lost 7,000, with another 20,000 captured. Fighting continues throughout the next few months, with the Germans taking Feodosiya in January 1942. In May of 1942, beginning with Operation Trappenjagd (Bustard Hunt) that would clear out the Kerch Peninsula, the Germans started with a 10-minute artillery assault, destroying the Russian lines, and then landed 902nd Assault Boat Command and 436th Infantry Regiment behind what was left of those lines.

On June 2nd, 1942, the Germans implemented Operation Sturgeon Catch, which was a three-prong attack from land, sea, and air, The Luftwaffe 8th Air Corps, commanded by General Wolfram von Richthofen, had 600 air craft with medium bombers, dive bombers, and torpedo bombers. The Corps flew 23,751 sorties and dropped 20,528 tons of bombs on, and around, Sevastopol. The Italians also gave naval help, while the German infantries moved in after the bombing stopped.

On June 13th, the LIV Corps took over Fort Stalin (concrete bunkers) after a heavy one-hour battle with the defenders. Next, Fort Lenin was taken on the 21st of June, and Fort Konstantinovsky captured on June 23rd. It was now a series of dominoes falling one after the other. On June 30th, Moscow finally ordered Sevastopol to be evacuated, but it came too late for many soldiers. Soviet officers and commanders were evacuated by boat and submarine in full view of their soldiers, although some chose to stay with their men. 23,000 soldiers, with many of them injured, were left in the city to await their fate. Of those evacuated, only 25,157 were successful, while some boats were bombed by German planes before getting away.

The final epitaph of the fall of Sevastopol was that after the Germans took Sevastopol, any Jews found were rounded up and executed. This continued for the next two years until the retaking of Sevastopol by the Russians (Soviets) towards the end of the war.

###

Germans (and Romanians) Russians (USSR)
  • Colonel General Erich von Manstein
  • General Erik-Oscar Hansen
  • Lt. General Fritz Lindemann
  • Lt. General Friedrich Schmidt
  • General Maximilian Fretter-Pico
  • Field Marshall Wolfram von Richthofen
  • Vice Admiral Filip S Oktyabrsky
  • Lt. General Vladmir N. L’vov
  • Lt. General Dmitri T. Kozlov
  • Major General Ivan Yefimovich Petrov
  • Admiral Gordey Levchenko
  • Major General Pyotr Novikov
  • Major-General Petr Morgunov
  • 11th Army (Manstein)
  • LIV Corps (22nd, 46th, 73rd Infantry Divisions (Hansen)
  • 132nd Infantry Division (Lindemann)
  • 50th Infantry Division (Schmidt)
  • 170th Infantry Division
  • Romanian 1st Mountain Brigade XXX Corps
  • 436th Infantry Brigade
  • 902nd Assault Boat Command
  • 22nd Panzer Division (Manstein)
  • 8th Air Corps
  • 51st Army (Ishun, retreat to Sevastopol)
  • 8th Naval Brigade
  • 388th Rifle Division
  • 44th Army (23,000 men)
  • 7th Naval Brigade
  • 775th Rifle Regiment
  • Coastal Army
  • Black Sea Fleet
  • 11th Army – 4,264 killed, 21,626 wounded, 1,522 missing
  • Romanians – 1,597 killed, 6,571 wounded, 277 missing
  • 18,000 killed, 95,000 captured
  • 25,157 evacuated by boats (mainly officers; soldiers left behind)

Photo Gallery

German Troops approach the burning city of Sevastopol, June 1942
Author unknown

Soviet troops man an armored train DShK heavy machine gun to defend against enemy airplane attacks, 1942
Author: Rumlin

Battle of Kiev 1941

Battle of Kiev
August 23, 1941 – September 26, 1941

In the time leading up to Operation Barbarossa by the Germans against Russia, Stalin, who had purged many of his experienced Soviet officer corps in earlier years, was already in a state of paranoia about perceived threats from within his staff, and refused to believe many of his intelligence spies when giving information about an impending invasion. He believed it was all western propaganda and many in his spy network were also recalled and purged. Hence, when the invasion started, the Russians were caught somewhat unprepared even though they had heard rumors of a potential invasion. They just did not know when it would happen.

As the German troops of Operation Barbarossa invaded Russia in June of 1941, Hitler made a change to one of his strategies by moving extra troops south towards Kiev in the Ukraine, where most of Russia’s Southwestern Front of the Red Army had gathered in and around that city. For Hitler, it was a two-point decision: remove the potential threat against the Army Group Center heading towards Moscow, and conquer the industrial centers of the south around Kiev. It was not a popular decision by his front-line generals, as driving towards Moscow had been the main object of the invasion. Of major concern for the generals was the originally planned schedule, based on the upcoming winter weather and keeping that drive alive and moving forward.

Meanwhile, in Russia, Marshal Georgi Zhukov, chief of the Red Army’s General Staff, laid out a case for moving the Southwestern Front away from Kiev to a point behind the Dnepr (Dnieper) River, thus sacrificing Kiev for the time being, but keeping the Red Army safe from being overrun. Stalin’s response was an explosive refusal to such a suggestion, much like Hitler’s blindness to logical advice from his generals about pursuing the Moscow drive instead of going south.

Upon Zhukov’s request to be relieved of his post as chief of General Staff, Stalin then sent Zhukov away to oversee the Reserve Front. What came next would prove to be the worst disaster of World War II for the Russian Red Army, and a major, though short-lived, win for the Germans.

The German Army Group South moved quickly toward Kiev, taking Vinnytsia and Lviv along with anything else in its way. Occasional tank battles engaged each other, although the German Panzer III and IV tanks without the proper fitted guns to pierce the T-34 Russian tanks, could only immobilize them by firing on the T-34 tanks’ tracks. The Panzer III versions armed with the 5 cm gun could also stop them at medium range. It took strategic maneuvering to cut off Soviet divisions from each other and then surround them to take them out. The Germans also took over the fuel depots after the battle at Dubno and continued towards Kiev.

The Russians at Kiev, under the 26th Army’s General Fyodor Kostenko, built an 18-mile anti-tank series of trenches along the Irpin River, with the help of 160,000 Kiev civilians mustered by Commissioner Nikita Khrushchev. It was a desperate attempt to save Kiev and it did stop the German Panzer division, but only for a short time. The German XLVIII Panzer Corps moved west and south, while the III Panzer Corps went east, beginning the encirclement of the remaining Russian forces and civilians in and around Kiev. The Russian fought hard against the Germans, making them earn every step gained towards Kiev. About the time that the Germans were preparing to move on Kiev, Guderian’s II Panzer Group arrived to reinforce the German army. The German army began isolating groups of Russian soldiers to break up any chance of them regrouping into larger groups that could become problematic again.

The German forces made entry into Kiev, moving along each street and demolishing Soviet strongholds with the low-riding StuG III armored vehicles, fitted out with the short-barreled 7.5 cm KwK37 L24 tank guns. They were accompanied by infantry using flame-throwers and demolition charges that took out anything left over. After several days of heavy fighting, the city finally surrendered on September 19th, 1941. As a parting shot to the Germans, those Russians who escaped, left booby traps around the city, and detonated them remotely, killing many German officers in hotels, as well as other personnel around the city. Isolated attacks continued sporadically over the next month or so, but finally that ended as well. The battle of Kiev was noted as being the largest encirclement of troops in military warfare history.

###

Germans Russians
  • Field Marshall Gerd von Rundstedt
  • General Walther von Brauchitsch
  • General Heinz Wilhelm Guderian
  • General Franz Halder
  • Marshal Semyon Budyonny (Southwest Army Group)
  • Marshall Semyon Timoshenko
  • General Mikhail Petrovich Kirponos
  • Lt. General Fyodor Yakovlevich Kostenko
  • Commissar Nikita Khrushchev
  • 47 divisions (700,000 soldiers total)
  • 2nd Army Group, 6th Army Group, 7th Army Group, 17th Army Group
  • 1st Panzer Group (General von Kleist)
  • 2nd Panzer Group (from Central under Guderian)
  • 907,000 soldiers, made up of the 5th Army*, 21st Army*, 26th Army, 37th Army*, 38th Army*, 40th Army. (*wiped out)
  • 3,923 guns and motars
  • 114 tanks
  • 167 combat aircraft
Losses: 26,856 killed, 96,796 wounded, 5,008 captured or missing
  • Losses: 700,544 casualties, with 616,304 killed, captured or missing.
  • 5th Army, 21st Army, 37th Army, 38th Army were nearly annihilated, while the 40th Army had many losses

Photo Gallery

German Soldiers attack a village west of Kiev
Attribution: Bundesarchiv, Bild 146-1974-099-45 / Hähle, Johannes / CC-BY-SA 3.0
Photographer: Johannes Hähle
Source: German Federal Archive

German 3.7cm Pak 36 anti tank gun and it’s crew overlook the Dnieper river after Kiev is captured by the Germans.
Attribution: Bundesarchiv, Bild 183-L29208 / Schmidt / CC-BY-SA 3.0
Photographer: Schmidt
Source: German Federal Archive

Battle of Tarawa 1943

Operation Galvanic: Battle of Tarawa
November 20-23, 1943

Allied Command planned on spreading their naval and air reach by first setting up air bases on the Marshall Islands, that would eventually support a naval and air campaign to take over the Mariana Islands. Only one obstacle stood in the way, and that was the well-fortified Japanese base found on Betio, the largest island sitting on the western edge of the Tarawa Atoll.

The atoll was part of the Gilbert Islands which had 16 atolls altogether, and taking over this area was essential for the Allied Forces as they moved closer on the path to Japan. Any Japanese strongholds in their way would have to be eliminated. Operation Galvanic was the invasion of Betio and, on a lesser level, the take-over of Makin Atoll 100 miles north of Tawara, both of which had been grabbed by the Japanese in late December of 1941 after the attack on Pearl Harbor.

The Japanese forces on Betio, consisting of 4,500 soldiers, led by Admiral Keiji Shibasaki, had built seawalls, a defensive trench line, and 100 “bombproof” concrete pillboxes at strategic points around the island, each housing 8-inch cannons. While Allied Command thought the island would be taken easily, it was anything but an easy take-over.

The Invasion Begins

On November 20th, 1943, the invasion began first with a naval and expected air bombardment on Betio to wear down any fortification structures and reduce the enemy. On hand were the USS battleships, the Maryland*, Tennessee, and Colorado, which had been damaged in the Pearl Harbor attack, then repaired, refitted, updated, and were now exacting revenge wherever they were needed. Supporting them, along with nine other battleships were 17 aircraft carriers, eight cruisers, 66 destroyers, 36 transport ships, along with a supply fleet. The total of troops was 35,000.

At Tarawa, as the bombardment began, the Maryland, using one of her 16-inch armor piercers, hit a Japanese ammunition room next to a pillbox housing 8-inch cannons and blew up both structures up, killing over 100 soldiers, and destroying everything around it. It was considered one of the greatest bombardment hits by a USS battleship in WW II.

When the naval bombardment subsided so that the smoke could clear out for the air bombardments, the first wave of 5,000 U.S. Marines (out of 18,000), headed towards the shore but the neap tide had not risen high enough for many of the landing crafts to get over the coral reefs. Soldiers began making their way through the chest-high water onto shore amidst heavy fire, while boats stranded on the reefs were bombed from the island. Those men moving through water, lost their radios to water damage along with other vital gear, and were exhausted by the time they made it to shore.

Other soldiers were luckier if they were in amphibious tractors (amphtracs “Alligators”) as these crawled effectively over reefs and barriers. But once they reached the beach, then they came under fire as they tried to unload. Meanwhile, the expected overhead support had not shown up yet. The naval bombardment started up again, and then the air support finally showed up.

On the north shore of Betio, there was a long pier jutting out past the coral reefs and the amphtracs were getting caught up there. Defenders had moved closer and were firing from either side of the amphtracs, leaving the marines stuck in their transports. One marine, Corporal John Joseph Spillane, formerly considered for the baseball teams as a pitcher, pulled off multiple miracles. As defenders threw grenades into his craft, he would pick them up and throw them back out again. He even caught one in the air and threw it back out. His actions saved many men that day and took out many Japanese fighters, but lost his right hand to the event when one exploded as it left his hand.

The highest cost of soldiers killed, occurred in the first day, at 1,500. The next day saw the neap tide still in effect, although it finally rose high enough by noon, finally allowing destroyers to move in closer and add bombing support as landing crafts moved in quickly and offloaded the marines. By the end of the second day, all the Japanese posts had been obliterated and the western section of the island was under control by the U.S.

One the third day, more heavy equipment was offloaded and the Japanese were now pushed back east of the airstrip on the island. The rest of the day was spent consolidating offenses throughout the island. On November 23rd, the aircraft carrier, Liscome Bay, was sunk by a Japanese submarine, with a loss of 687 souls, 30 percent of all losses in this battle.

By the end of the battle on Betio, only 17 Japanese soldiers were left alive. Many strategic lessons were learned from this battle, along with redesigning radios to be waterproof so communications could still be kept in place.

###

*Aside from Tarawa, the USS Maryland saw action at the battles of Midway, the assault on Kwajalein, the Marianas Campaign (Saipan), the invasion of Peleliu, battle of Leyte Gulf, and the invasion of Okinawa, before finally returning American servicemen home after the war ended.


Americans Japanese
  • Admiral Raymond A. Spruance
  • USN Admiral Richmond K. Turner
  • USN Admiral Harry W. Hill
  • USN General Holland M. Smith
  • USMC General Julian C. Smith
  • USMC Lt. General Leo D. Hermle
  • USMC Major General Merritt A. Edson
  • USMC General David M. Shoup USMC
  • Rear Admiral Keiji Shibazaki
V Amphibious Corps

  • 2nd Marine Division
  • 27th Infantry Division US Fifth Fleet
Island Forces:

  • 3rd Special Base Defense Force
  • 7th Sasebo Special Naval Landing Forces Imperial Navy
  • 35,000 troops
  • 18,000 Marines
  • 12 battleships
  • 17 aircraft carriers eight cruisers
  • 66 destroyers
  • 36 transport ships supply fleet
  • 2,636 troops,
  • 2,200 construction laborers – (1,000 Japanese and 1,200 Korean)
  • 14 tanks 40 artillery pieces
  • 14 naval guns
  • 1,696 killed
  • 2,101 wounded
  • 4,690 killed
  • 17 captured
  • 129 laborers captured

Photo Gallery

United States Marines shortly after landing on the beach at Tarawa, November 1943

U.S. Marines fighting on Tarawa November 1943

Knocked out American LVT on Red Beach 1, November 21 1943

Knocked out American Sherman medium tank on the beach, November 22 1943

U.S. Marine Navajo codetalker, November 1943

75mm M114 Howitzer and its crew provide artillery support to advancing Marines, November 22 1943

Destroyed Japanese command post and knocked out Japanese type 95 Ha-Go light tank, November 1943

Battle of Singapore 1942

Battle of Singapore
February 8th–February 15th, 1942

Malaya (now Malaysia) had already been invaded by the Japanese, starting on December 8th, 1941, with an initial fly-over bombing attack. Through December into January, most of the unprepared surviving Allied troops stationed around the island had already retreated down to the bridge leading into Singapore. It was a terrible rout by the Japanese, who had maps of every part of Malaya, including the centralized “impenetrable jungle,” due to many years of information gathering by Japanese intelligence people, acting as regular citizens in Malaya and Singapore.  

Many Allied forces were lost on the road of retreat, including those left behind who were too injured to be moved and their medical personnel who stayed with them to the last. They were rounded up, beaten, used for bayonet practice, and generally massacred on the spot.  

Off the coast, the British battleship, HMS Prince of Wales and the battlecruiser HMS Repulse, were both sunk in a vicious battle from the air and by submarine.  This left Singapore without any naval defenses to come to their rescue.

The final retreating Allied troops crossed the Johore Causeway into Singapore on January 31st, which was then partially blown up by British Command under Colonel A. E. Percival, a hero of the first World War. Singapore itself was now the final objective for the Japanese invading forces. There were 85,000 men at the start of the invasion,  but by now many were non-combatants, were part of medical teams, or soldiers who no longer had any weapons after enduring the retreat, along with those who were injured and being cared for.

Essentially, Singapore was now a sitting duck in the open with no defenses to protect its people.

The Assault Begins on Singapore

On the Japanese side, 30,000 battle-hardened troops of the 5th, 18th, and Imperial Guards, were commanded by General Tomoyuki Yamashita of the 25th Imperial Japanese Army. His forces were supported by 35,000 troops and Malayan laborers who fortified the supply lines on the main line, although supplies were getting very low. 

Singapore was shelled and strafed with tracer bullets constantly over the next few days from February 8th onwards, and the entrenched population were dying daily from that, as well as from fragments of bombed buildings that hit them. Churches, hotels, the Cricket Club, Singapore Club, and the post office had been turned into makeshift hospital wards for the wounded.  Drinking water and food was in short supply and many were suffering from the heat at well. 

Surrender of Singapore

On February 15th, General Percival finally ceded defeat and met with General Yamashita at the Ford Motor Factory at Bukit Timah. The Japanese had plenty of journalists and photographers on hand to record the surrender, and the pictures and news were sent around the globe.

What was once a thriving port of the British Empire, was now in ruins. Most of the soldiers, those not executed outright, ended up in concentration camps for the next few years, including Percival. Neither side, at the time of the surrender, fully understood the historical importance of the event until years later. For the British Empire, it was the worst military disaster in its military history.  The event also made clear that the British colonial way of life had become outdated and closed in its philosophy, unable to adjust to seeing further than its own backyard.

###

Allied Forces Japanese Forces
  • Lt. General Arthur Percival
  • Lt. General Gorden Bennett (AUS)
  • Lt. General Lewis M. Heath
  • Major General Merton Beckwith-Smith
  • General Tomoyuki Yamashita
  • General Takuma Nishimura
  • Lt. General Takuro Matsui
  • Lt. General Renya Mutaguchi
  • III Indian Corps: 9th and 11th Divisions
  • AUS 8th Division British
  • 18th Division
  • Malay Regiment, Straits Settlements Volunteer Force, Dalforce
  • 25th Army Imperial Guards
  • 5th and 18th Infantry Division
  • 3rd Air Division Japanese Navy
Beginning Strength
  • 85,000 soldiers
  • 300 artillery pieces
  • 200 AFVs 208 anti-tank and anti-aircraft guns
  • 54 fortress guns
  • 36,000 soldiers
  • 440 artillery pieces
  • 3,000 trucks (also light tanks)
  • 5,000 killed/wounded
  • 80,000 captured
  • 1,714 killed
  • 3,378 wounded

Photo Gallery

British soldiers during Bayonet practice, October 1941

New arrivals of the Indian Commonwealth troops, November 1941. These troops were not as well trained and equipped as the British troops.

An Australian 2 pounder (40mm) anti tank gun and it’s crew, January 1942

Japanese type 95 Ha-Go tank destroyed by an Australian 2 pounder (40mm) anti-tank gun

Victorious Japanese soldiers marching through Fullerton Square, February 1942

Battle of Moscow 1941-1942

Operation Typhoon: The Battle of Moscow
October 2nd, 1941 – January 7th, 1942

The Axis Operation Barbarossa (originally Otto), which was the overall assault on Russia, split the German forces into three parts after crossing the border: one part headed north, another part headed south, and the central forces headed for Moscow. Adolf Hitler’s goal in Russia was to take over the country, use the remaining Russians as slaves to the Germans, minus any Jews, Gypsies, and Slavic races. Operation Barbarossa began its incursion over the Russian border on June 22nd, 1941, and on July 22nd, 127 German bombers made their first bombing run over Moscow. The Russians began barricading the streets in anticipation of a direct ground assault. For Hitler, taking Moscow was both an economic and political goal.

Up until October of 1941, most of the action was a series of attacks or skirmishes at various points outside Moscow. Operation Typhoon began officially on October 2nd, when Field Marshall Fedor von Bock made the first direct move in a ground assault on Moscow. But German forces were already affected by a lack of enough food, the cold Russian winter weather, including muddy roads from rain and snow, which hampered or immobilized many of the German vehicles. Another problem was the cold affecting firearm operations as well.

Reinforcements and supplies were slow in getting to the German forces, as railroad tracks were a different gauge for their own trains to travel on. Each of these tracks had to be reset to accommodate trains from Germany to move supplies in. Russian resistance groups would destroy parts of the tracks as well, making track replacements an ongoing exercise for the Germans. Capturing Moscow was vital to Hitler’s goal as once Moscow went down, then he expected that the whole country would promptly crumble to pieces. Up to this point, the overall Barbarossa campaign had gone well but weather conditions, and the fact that the German forces were split between actions on both the Eastern and Western fronts, began to take a heavy toll on the Germans everywhere.

What started out as a German blitzkrieg over the Russian border, with a loss of 28 Russian divisions, and 70 more divisions losing 50 percent of soldiers and equipment, now turned back on the Germans. After a month of laborious warfare, the Germans overall had lost 100,000 soldiers, 50 percent of their tanks, and more than 1,200 planes.

Bock’s starting resources for the Moscow battle was one million soldiers, the IV Panzer Group (Guderian) pulled from the Leningrad siege, 1,700 tanks, 950 air craft, and 19,500 artillery guns. Meanwhile, the Russians only had less than 500,000 fighters, half the tanks, and had to initially relay on Moscow citizens to help with building fortifications in the city.

Bock began his campaign by circling Moscow from the north while Colonel General Heinz Guderian and his Panzer division came in from the south. Both armies were to meet up at Noginsk on the eastern side of Moscow. On the way, Bock took Klin and then crossed the Moscow-Volga Canal, but was then halted and pushed back, while Guderian took Stalinogorsk. It was now November 22nd. On December 1st, after heavy fighting, Bock took Naro-Fominsk.

Meanwhile, a German reconnaissance team had made it to five miles outside of Moscow at Khimki on December 2nd. It was at this point that the campaign came to a halt due to the freezing cold and that the Germans had not received any winter clothing or other supplies.

The delay in the Germans reaching their target also gave time for the Russians to be reinforced, and they began moving on the offense. Hitler, in the meantime, unhappy with how things had gone, removed Bock and installed Field Marshal Günther von Kluge. But it was already too late for the Germans to succeed in their goal and they were pushed back by Russian forces over 100 miles from Moscow. It would be the first and biggest disaster for the Germans and set the course for the rest of the war in Russia because of the tremendous loss of manpower and equipment. It did not help either to realize that Napoleon had travelled the same road into Russia nearly a century earlier.

###

German Russian
  • Field Marshall Fedor von Bock
  • Colonel Gen. Heinz Guderain
  • Field Marshal Albert Kesselring
  • Field Marshal Günther von Kluge
  • Marshal Geogry Zhukov
  • Marshal Aleksandr Vasilevsky
  • One million soldiers
  • 1,700 tanks
  • 950 combat planes
  • 19,500 artillery guns
  • 1,250,000 soldiers or fighters (started with 500,000 before reinforcements)
  • Under 900 tanks
  • 300 combat planes
Estimated losses = 248,000 to 400,000 Estimated losses = 650,000 to 1,280,000

Photo Gallery

Soviet civilians mostly women and elderly men digging trenches. Younger men were not civilians but soldiers, October or November 1941
Source: Scanned from “Russia Besieged” (ISBN 705405273), page 165
Author: United States Information Agency

Soviet Troops under artillery fire, September 21 1941
Photographer: Anatoliy Garanin
Source: Russian International News Agency

Soviet 82mm mortar in a hole for defense against enemy artillery, December 1941
Photographer: Alexander Ustinov
Source: Russian International News Agency

Soviet soldiers near the woods, December 1 1941
Photographer: Oleg Knorring
Source: Russian International News Agency

Soviet anti aircraft gun and its crew, 1941
Author: Ilya Kopalin (director)
Source: https://archive.org/details/MoscowStrikesBack

Soviet soldiers near Moscow, 1941 or 1942
Author: Ilya Kopalin (director)
Source: https://archive.org/details/MoscowStrikesBack

Soviet soldiers advance in battle with the a t-34/76 tank.
Source: http://waralbum.ru/151448/

Soviet soldiers with a PTRD-41 anti tank rifle, 1941
Source: http://waralbum.ru/113577/

Operation Cobra (The Breakout from Normandy) 1944

Operation COBRA:
The Breakout from Normandy

After the Normandy invasion, the Allies had captured St Lô and were now stretched along the northwest coastline, ready to move inland, with the Americans headed for Brittany. Lieutenant General Omar Bradley, in charge of the American’s First Army, along with the other Allied leaders, understood from intelligence that the German front was already weakened from the invasion battle.

With General George C. Patton, the commander for the Third Army in mind, he devised a plan for breaking through the German lines, with the theory that those lines would break down and collapse after a hard push. This would become Operation Cobra. Cobra was supported by other operations conducted by the British, the Polish, and Canadian forces in Operations Atlantic, Spring, Totalise, Goodwood, and Tractable. They would capture Caen, while the Americans wanted Cherbourg, a vital seaport for receiving Allied supplies.

The opening attack would be aerial bombing by 200 bomber planes, but it was a risky plan because dropping bombs, as well as napalm on a battlefield, was less than exact. The idea was to drop over 3,300 tons of bombs and then the Allied troops could move in at once to mop up the mess and take out whoever was left. Unfortunately, Bradley also set his front line at only 1,000 yards outside the bombing perimeter, expecting the air force to bomb in the supposedly agreed-upon parallel formation.

The bombing attack was scheduled several times, and then cancelled. But on July 24th, some of the 8th Air Force bombers (1,500 B-17s and B-24s) already on route to bomb the site, did not receive the message and the bombing attack killed 25 soldiers from the 30th Infantry Division, and injured 130 more. The attack was then set officially for the next day (July 25th) but again, the lack of precision of the bombs took out even more Allied soldiers. Over 100 soldiers were killed, along with nearly 500 casualties. Well-known war correspondent, Ernie Pyle, was in the midst of the fire storm and reported on the grim battle. Meanwhile, the artillery unit of the 7th and 8th Corps added to the shelling of the region, and with 2,251 tanks, with 60 percent fitted with hedge-cutting saw-tooth scoops (“Rhinos”) on the front, the Americans could move through any terrain.

The results of the bombing attacks on the German side destroyed an extensive area of their front by taking out the communication systems, killing and wounding German soldiers, and made the Panzer Lehr Division inactive, due to tanks being turned over by the blasts. Some tanks also fell into the resulting bomb craters, with no chance of ever getting out of them. Only 190 German tanks were in this sector, as Adolf Hitler had moved all the others, including the formidable Tiger and King Tiger tanks, to Caen to support that attack.

While this was a major turning point, it also left some difficulties for the Allied troops, particularly with their own tanks moving through the lines, as they had to move carefully around all the craters to avoid getting stuck. The Germans had also set up 88 mm tank buster guns, hidden within the bombed rubble, and the Americans had to take each one of those out before advancing further. Adding to that problem were remaining German soldiers who made ‘hit-and-run’ guerrilla attacks, using any berm-styled rubble formations left from the bombings, to hide behind.

However, once the Allied troops had moved through the area, progress was made in moving faster, with an added three divisions from the US Army VII Corps to bolster the advance. The Americans entered and liberated Avranches on July 30th, and later repelled a German counterattack on August 7th, which was, in the end, of little consequence. Marigny and St. Gilles were also main infantry objectives in the march forward.

As each operation conducted by the Allies achieved its goals, the Allied forces began surrounding any remaining German forces. While 100,000 Germans did manage to escape, nearly 50,000 German soldiers, along with 350 tanks and 2,500 military vehicles were captured by the Allied forces by August 22nd. From here, the goal was to move on to Paris and liberate her. Ultimately, the Germans suffered their losses because Adolf Hitler refused to listen to his generals about the severity of the situation in France, and ordered that forces be where they were not really needed. The success of COBRA was also the beginning of the end of the German occupation of France.

###

American Forces German Forces
  • General Sir Bernard Montgomery (Overall)
  • Lt. General Omar Bradley (US overall, 12th Army Group)
  • Major Gen. J. Lawton Collins (7th and 8th Corps)
  • General George C. Patton (3rd Army)
  • Major Gen. Troy Middleton (VIII Corps)
  • Major Gen. Charles H. Corlett (19th Corps)
  • Field Marshall Günther von Kluge
  • Colonel Gen. Paul Hausser
  • General Eugen Meindl
  • 8 infantry divisions
  • 3 armored divisions
  • 2,451 tanks and tank destroyers (M4 Shermans, M5A1 Stuarts, M10 tank destroyers)
  • 200 Air force bombers
  • 2 infantry divisions
  • 1 parachute division
  • 4 Panzer divisions
  • 1 Panzergrenadier division
  • 190 tanks and assault guns
  • 1,800 casualties
  • c. 109 medium tanks destroyed
  • light tanks and tank destroyers (unknown losses)
  • 2,500 killed
  • 10,000-50,000 captured Germans
  • 70 tanks and assault guns destroyed

Photo Gallery

A wrecked German Sdkfz. 251 armored halftrack in Northern France destroyed by the USAAF July 26 1944
Source: United States Air Force

American soldiers with a Browning M2 heavy machine gun in a town in Normandy France, July 1944
Source: United States National Archives

British Churchill tank in the rubble of the village of Maltot France July 26 1944
Photographer: Handford
Source: Imperial War Museum

Abandoned German equipment and vehicles on a road leadding to Avranches, Francce July 31 1944Source: United States Army

German and Soviet Invasion of Poland 1939

The Preparation for Invasion

The Treaty of Versailles at the end of World War I, had decimated Germany, reducing its military to a small military ground presence. When Adolf Hitler decided he would take back much of what was taken from Germany as part of that treaty, he began the covert buildup of forces and building in secret, of planes, submarines, and vehicles in other countries in Europe. When his forces could no longer be hidden, Hitler made his first step into France, meeting little local resistance. Then, he took over control of Austria (annexed), Czechoslovakia, and after the Soviet Union, ruled by the brutal dictator, Joseph Stalin, signed a non-aggression pact with Germany, secretly giving the Soviet Union a portion of Poland in return, Hitler moved on Poland. Hitler falsely claimed that Poland had attacked first, but it was set up as an attack by Germans in Polish military clothing. On September 3rd, 1939, after the Polish invasion had begun, England and France declared war on Germany.

The Invasion

On the morning of September 1st, 1939, nearly 1.5 million German troops invaded Poland from the Polish-German’s 1,750-mile border, moving from the north, south, and west, towards Warsaw. At the same time, German warships and U-boats attacked as many Polish military vessels as they could find, and air strikes from the German Luftwaffe destroyed Polish airfields and planes, and bombed numerous towns. The sudden fast-paced assault would be known as a “blitzkrieg”, when adding in panzer tanks and other motorized infantry groups, which quickly barreled through any defenses put up by the Polish people. The Polish armed forces had mustered one million soldiers but there was a lack of strategy in attacking the Germans, who were far more heavily armed and organized than the Polish were. Even horse cavalry groups were sent against German tank units, and were promptly annihilated.

The Soviet Union, meanwhile, was caught by surprise at the suddenness of the attack, and scrambled to make the best of the situation, by immediately demanding its portion of Poland be turned over to them, as per the non-aggression pact. The public joint country statement was that this invasion was part of restoring peace and stability in the region, along with preparing for a new political oversight situation.

On September 17th, the Soviet Union entered Poland from the Russian-Polish border and took over its promised section, which was nearly half of Poland, including the stored resources of Ukrainian wheat and Romanian oil, which Hitler had wanted. Russia now also had control over the Baltic states as well, and all was given to them without the Russians firing a shot.

The French and the British also bore some responsibility for the devastation of Poland, in that it had not moved soon enough to stop the Germans from advancing. England and France had even advised the Polish not to mobilize it forces, thinking there could be some agreement reached with the Germans. The French, for their part, were tired of war, its fighting forces devastated in the first World War. Both countries had promised in writing that they would protect Poland from any invading forces, yet when it came, the British and the French were already too late to do anything about saving the Polish people. Both countries gave Hitler an ultimatum to get out of Poland, but when the deadline passed, all they could do then was to declare war on Germany. However, this would also prove to be the beginning of the end of France, as Hitler turned his next actions towards France and Norway in 1940.

###

Facts to Know:

The Forces Involved in the Invasion of Poland

The Germans

North Assault: Colonel-Gen. Fedor von Bock

South Assault: Colonel-Gen. Gerd von Rundstedt

The Polish

Marshal Edward Smigly-Rydz

  • 62 divisions

-50,000 Slovakian soldiers included

-1.5 million German soldiers

  • 1,300 aircraft

-Junkers Ju-87 dive-bombers

  • 3,200 Panzer tanks
  • 18 divisions

-1 million Polish soldiers

  • 12 cavalry divisions
  • 600 tanks (Polish Single turret 71TP)
  • No airplanes left after overhead bombing 
The Russians invaded with over a half-million troops, surrounding the remaining Polish soldiers and people who had escaped to the border.

Photo Gallery

German Panzer I, Panzer ll and Sdkfz.251 armored halftrack in Poland on September 3 1939. The German officer in the halftrack might be Heinz Guderian
Source: German Federal Archive
Identification Code: Bild 146-1976-071-36

German Heinkel He 111 Bomber Gunner’s view of a Polish City aboard a German He 111 bomber, Sep 1939
Source: United States Library of Congress

German troops fighting in the streets of a Polish two September 1939
Photographer: Wagner
Source: German Federal Archive

A young Polish girl holding her dog in a damaged neighborhood in Warsaw, Poland, September 5 1939.
Photographer: Julien Bryan
Source: United States Holocaust Memorial Museum

German General Blaskowitz accepting the surrender of Polish soldiers near the Skoda factory in Warsaw, Poland, September 28 1939
Source: German Federal Archive
Identification Code: Bild 146-1976-032-19


Battle of Taierzhuang 1938

Battle of Taierzhuang
March 24, 1938 – April 7, 1938

While most countries were gearing for war with Hitler, Mussolini, and other axis powers, China was already in a war against the aggression of Japan. In 1937, there occurred the Marco Polo Bridge incident on July 7th, which started the first small battle between the Chinese and the Japanese over a missing Japanese soldier, who was found to have been shot and killed. Up to this point, there had been only minor skirmishes, although Japan had already infiltrated Manchuria, starting in 1931.

Under various agreements conducted at the beginning of the century, any country with an operating legation, could keep a small number of soldiers handy for protection and travel. But Japan had over-extended itself in its quest for taking over land with vital natural resources. There were also hidden political agendas at work between the Communist and Kuomintang (KMT) parties in China, and with the KMT Party involved with the Japanese, the Communists would have an easier time making its own moves, although this was never said outright. The Marco Polo Bridge incident, however, escalated hostilities between the two countries, with the next two battles exacting a horrific toll on life.

The Battle of Shanghai occurred between August and November of 1937, with Chiang Kai-shek as the leader of the KMT Party, trying to push the Japanese garrison out of Shanghai and into the river. But Chiang’s forces suffered terrible losses, especially when Japanese reinforcements arrived, both from the Yangtze River and from foot troops. The final Shanghai battle at the Sihung Warehouse (October 27th-November 1st), while a loss for the Chinese, was also shown to a global audience to garner support and help from the Western Powers against Japan. But that never happened.

The following Battle for Nanjing (Rape of Nanking) was a brutal battle, with an estimated 100,000 Chinese slaughtered, with women raped before being killed, and others buried, dismembered, or drowned alive. It seemed there was no hope for the people of China against the Japanese invader. But then came a battle at a small town that would change everything for the Chinese people, and break the global perception that Japan was undefeatable.

The Battle of Taierzhuang occurred during the Japanese’s effort to merge and tighten up the areas around Shanghai and Nanking after those two battles were won. The larger engagement was known as the Battle of Xuzhou. Taierzhuang was located on a strategically-placed system of railroad and canal junctions, including the Grand Canal of China, and was logistically important for the Japanese to take over and remove the Chinese forces that had built up there over time. It would then be easier for Japan to bring in more supplies and reinforcements.

However, KMT Generals Li Zongren and Bai Chongxi, along with Commanders Yu Xuezhong and Wei Yunsong, planned on surrounding the Japanese in the area, and with the help of thousands of fighters, dressed as local farmers, began sabotaging Japanese resupply lines, making it very difficult for the Japanese to stay supplied.

The battle took two weeks of intense skirmishes, including an attempt by the Japanese to tunnel under the walls of Taiuerzhuang, to take the town from the inside. But the infiltrators were caught and executed. When the Japanese then made a direct-on attack into the town, Chinese fighters surrounded them, forcing the Japanese to make a hasty retreat.

This first win for the Chinese people was celebrated in many cities, and showed everyone that the Japanese were not totally invincible. They could be defeated and this win at Taiuerzhuang, built up the morale of the Chinese people and its fighters.

###

Participants at the Battle of Taierzhuang
Chinese Japanese
  • General Li Zongren
  • General Bai Chongxi
  • Commander Yu Xuezhong
  • Commander Wei Yunsong
  • Rensuke Isogai (10th Division)
  • Itagaki Seishiro (5th Division)
31st Division with 91st and 93rd Brigades:

  • From the 93rd Brigade, the 186th Regiment guarded the town’s center, while the 185th guarded Beilou and Nanlou, north of the town.
  • From the 91st Brigade, the 181st Regiment guarded the northside railroad station, while the 182nd guarded the canal’s south bank.
  • 10th Imperial Division
  • 5th Imperial Division
100,000 to 400,000 (10 divisions)
  • 40,000 to 70,000 (3 divisions)
  • 80 plus tanks
  • 19 plus armored vehicles
  • Planes
20,000 killed 11,198 killed (according to Japan)

Photo Gallery

Chinese troops arrive by train near Taierzhuang March or April 1938
Source: Republic of China Ministry of the National Defense

Chinese army field gun and it’s crew in Taierzhuang, March or April 1938
Source: Republic of China Ministry of the National Defense

Chinese soldiers in urban house-to-house fighting in Taeirzhuang, April 1938
Location: Tai’erzhuang (Shandong), Pizhou (Jiangsu)
Source 台儿庄战役珍贵图集

Kokoda Track Campaign 1942

(July 1942 – November 1942)

            Shortly before World War II began, Japan had already begun a campaign of invading and conquering valuable territory, both in Asia and the Pacific, particularly if such territories either helped replenish needed resources, or to fortify strategic positions to stave off attacks from other world powers. Australia was one such country that if the Japanese could take it over, then the Allies would lose a very valuable source of supplies and soldiers.

By 1941, Japan was close enough to New Guinea off the northern tip of Australia, to begin implementing her plan to take Port Moresby on the south side of Papua New Guinea, just across from Australia. While the Japanese landed soldiers on the northern side at Gona, the Japanese sent another landing group around the island towards Port Moresby, but it was stopped during the battle of the Coral Sea.

Consequently, the Japanese changed tactics and decided to land more troops at Gona and other areas along the northern coast. Then, they planned to travel through the country’s mountainous jungles on the 60-mile-long Kokoda Track that ran across the island, from the northeast point at Kokoda Village, to the southwest point at Owers’ Corner. From there, it would be a short trek towards Port Moresby on the southern coastline. The Kokoda Track Campaign began officially on July 21-22, 1942, with Japanese landings at both Gona and Buna on the northern coastline. From there, the Japanese forces began moving on Kokoda, pushing back on the 39th Australian Infantry Battalion and the local Papuan Infantry Battalion, which put up a fierce fight, but who had to retreat along the trail into the jungle. The two Allied groups would become known as the Maroubra Force.

Into the Jungle

            Once the Japanese had possession of the village of Kokoda, then they also had control of the only airfield in the island’s northern section. Meanwhile, Maroubra Force had retreated to Deniki, some four miles into the trail, and once there, launched a counterattack to regain control of Kokoda on August 8th, but failed. The Japanese forces continued to move along the trail, while the Maroubra Force had to retreat further along the trail, fighting every step of the way.

A valiant battle was fought at Isurava, after which the Allies retreated to Brigade Hill, where another battle was fought, proving to be disastrous for the Australians, and losing nearly the whole 27th Regiment reinforcement group on the adjoining Mission Ridge. Brigadier Arnold Potts of the Maroubra Force was later replaced by Brigadier Ken Eather, who was the commander at the next battle at Ioribaiwa Ridge. While there were far less losses in that battle, the Australians made a final retreat, and regrouped with new reinforcements for a last battle at Imita Ridge, some 30 miles from Port Moresby. Eather had already been informed by Allied Command, that he would have to hold Imita Ridge at all costs, to keep the Japanese from taking Port Moresby. There were to be no further retreats.

            As the battle at Imita Ridge began, the Japanese had already begun to run out of supplies and reinforcements, so when the Australians fought back, the Japanese had to retreat from where they had just come from. The Australians followed them, hounding them each mile down the track until they were finally pushed all the way back to Gona and Buna, and the Allies retook Kokoda in the process on November 2, 1942.

The Kokoda Track Campaign would be one of the most important decisive battles for the Australians during WW II, that is still remembered and honored today by Australians, even though the battle itself is not well-known internationally.

###


Australians Japanese
  • General Douglas MacArthur
  • General Sir Thomas Blamey
  • Arthur Allen
  • George Allen
  • Brigadier Arnold Potts
  • Brigadier Ken Eather
  • Major General Tomitarō Horii
  • Colonel Yokoyama Yosuke
  • 39th Battalion (4 platoons)
  • Papuan Infantry Battalion
  • Second Australian Imperial Force (AIF) 21st Brigade
  • 25th Brigade (Eather)
  • 12,000 total men involved with the Track
  • 144th Infantry Regiment (three battalions),
  • 41st Infantry Regiment (2nd and 3rd Battalions, with 1st Battalion to join later,
  • 1st Battalion, 55th Mountain Artillery Regiment
  • 6,000 total men involved with the Track
Australian Losses Japanese Losses
  • 625 Australians killed
  • 1,600 wounded
  • 4,000 ill
  • 150 New Guinean locals (PIB and porters)
  • 2,000 killed in battle
  • 3,000 died from disease and illness
Click Here For Your FREE WWII Special Report